
Clinical Case Record: Tracking Outcomes
Follow each procedure over time with follow-up entries, outcome tracking, photos, and trends.
The Treatment Diary
If the dental chart is the map, the Case Record is the diary: one entry per procedure actually performed, with the tooth, the date, the materials, the operator, photos, and what happened afterwards. Six months later, when a patient returns with pain near a tooth you restored, this tab answers the questions that matter — what exactly was done, with what, by whom, and how did it respond at follow-up. Clinics that keep it faithfully never argue from memory.
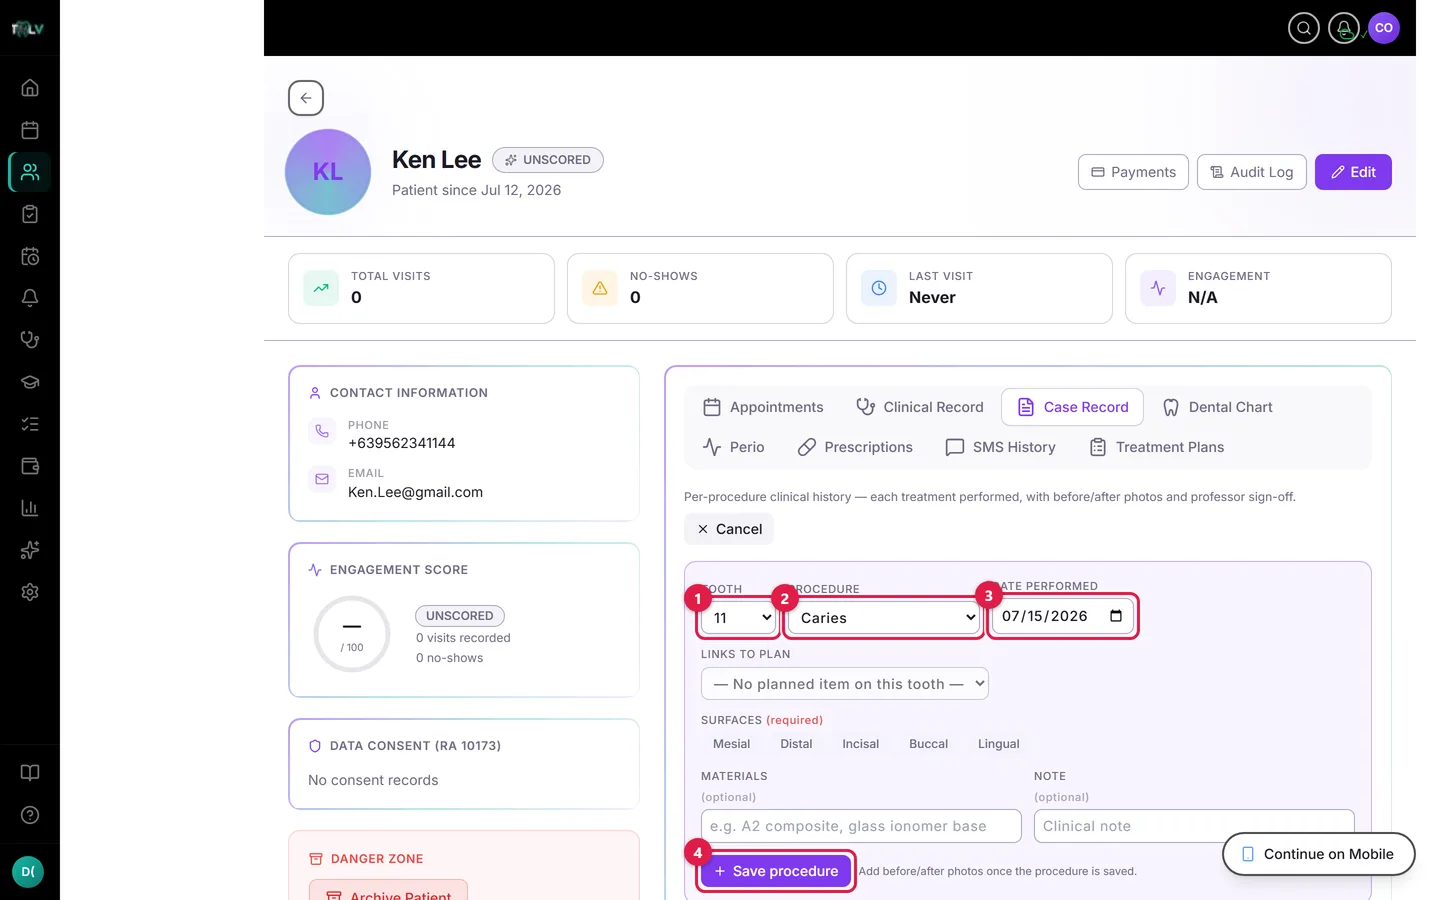
On this form: ① Tooth — the FDI tooth the work was done on. ② Procedure — what you performed, from the same catalog as the chart. ③ Date performed — defaults to today; backdating is allowed up to today only. ④ Save procedure — writes the entry to the timeline; add before/after photos once it's saved. If the tooth has planned chart marks or the patient has an active treatment plan, extra fields appear to link this work to them.
Recording a Procedure
- Click Record procedure.
- Pick the Tooth and the Procedure — the same catalog the chart uses, so records line up.
- Set Date performed (defaults to today; you can backdate, never future-date).
- If the tooth carries planned chart marks, Links to plan ties this work to the planned item — that's what flips the chart mark to Completed. Part of treatment phase ties it to a treatment-plan phase, formatted "{Plan} › Phase {n}".
- Surface-level procedures require at least one Surface chip — the guard won't let a filling go in without saying which surfaces.
- Add Materials ("A2 composite, glass ionomer base") and a Note, then Save procedure.
Two details worth knowing: your half-typed form auto-saves as a draft per patient, so switching tabs mid-thought loses nothing; and the photo panel appears after saving — add the before/after pair right then, while the case is fresh.
Materials Are Future-You's Best Friend
"Composite, tooth 25" tells future-you almost nothing. "A2 composite over glass ionomer base, distal-occlusal" tells you the shade to match, the technique used, and what you'll find when you drill. Spend the extra ten seconds.
Follow-Ups: Closing the Loop
Most records systems stop at "done." This one tracks what happened next. On any entry, click Record follow-up:
- Choose the outcome — Monitoring, Resolved, or Failed.
- Tap finding chips for symptoms (or No symptoms, which clears the rest).
- Set the Assessed date, and — the important one — an optional Recall date.
- Add notes and a plan / next step.
Each follow-up shows a trend arrow versus the previous one — Improved, Worsened, or Unchanged — plus the days elapsed since the procedure. A root canal that reads "Monitoring → Monitoring → Resolved" across three entries is a documented success; one that reads "Worsened" twice is telling you to act.
The Recall Date Feeds the Whole Reminder Engine
That little Recall field is load-bearing: every procedure or follow-up with a recall date appears in Reminders > Follow-ups Due, grouped per patient, escalating from amber to red as it ages. Set it every time there's a genuine reason to see the patient again — re-evaluations, suture removal, prosthesis checks, six-month reviews — and your recall list builds itself instead of living in someone's notebook.
In Teaching Clinics
Student-recorded procedures carry a sign-off badge and only count toward graduation requirements once approved. Faculty click Review & sign off, then Approve or Needs redo — sending work back requires a written remark, so the student always knows exactly what to fix. The record keeps both the work and the teaching conversation.
Was this article helpful?
Need more help? Contact our support team